Database Model Depository
Database is formal way to host Model Depository. Three Relational Database Management System (RDBMS) are supported: SQL Server (Recommended), Oracle, and MySQL. ODBC Connection to these databases must be properly set.
Preparing for Model Depository Initialization
Initialization of Model Depository is the first step of the model build life cycle. It is assumed that the model is presently maintained in a foreign system, such as EMS. This step is used to initialize the Model Depository by importing a full model in CIM/XML exported from the system where the model is currently maintained.
For database Model Depository, an empty database must be created before model depository initialization. This is usually done by the database administrator. After that, Model Depository configuration should be set up, most importantly, with the correct connection string to the Model Database. The “seed” base model must be loaded into the Tool and validated.
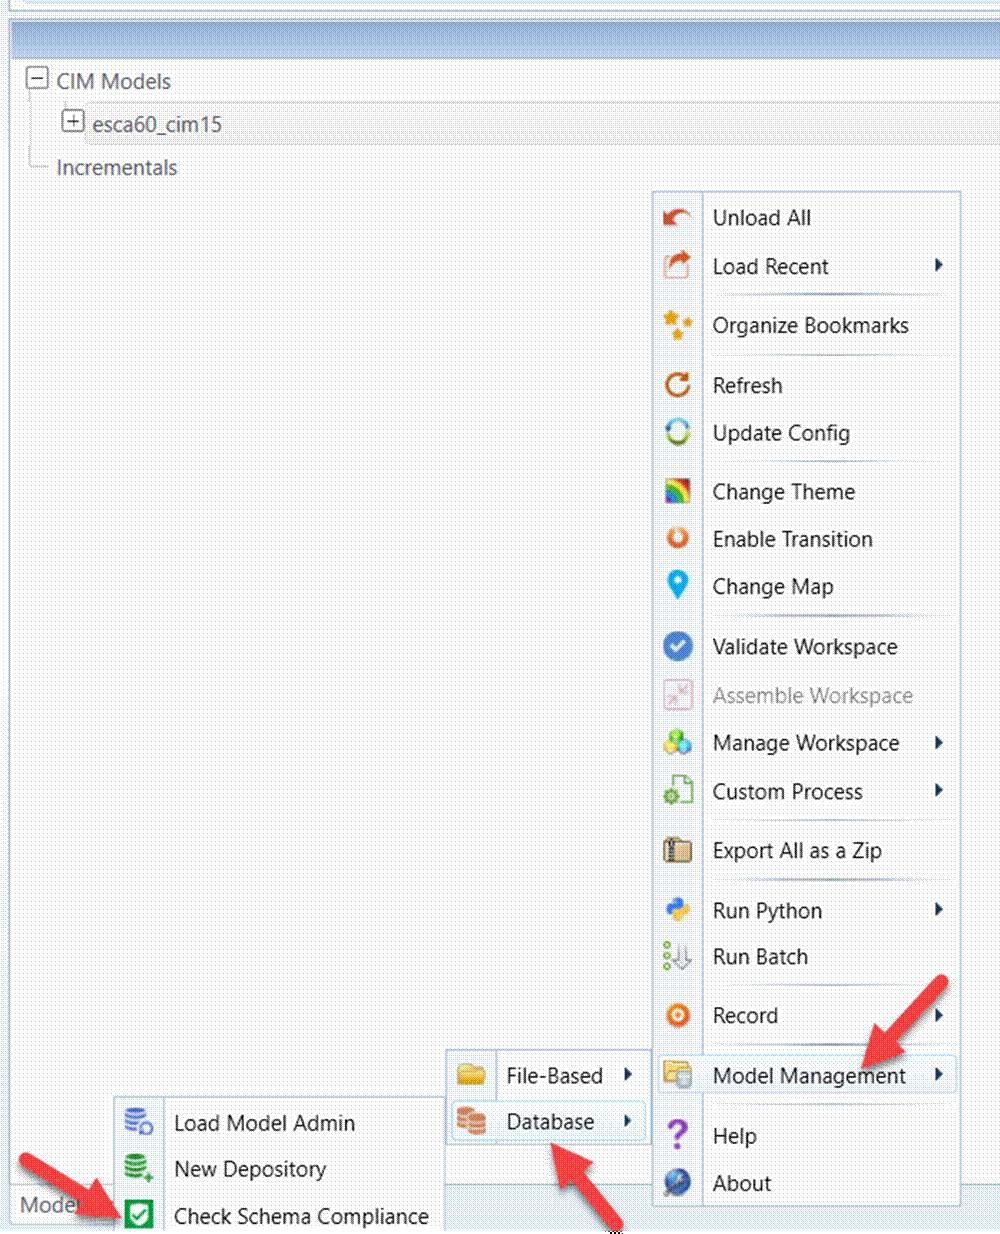
Preparation shall also be made to ensure that the seed model conforms to the governing profile. This is normally achieved by checking scheme compliance, which can be invoked from the global context menu “Model Management→Database→Check Schema Compliancy”. The global context menu can be called by clicking a blank spot in the tree panel, as illustrated below.
The schema compliance checking is a light-weight validator designed to check whether there are any issues when the seed model is used to initialize the database Model Depository. The reported issues are only related to Model Depository initialization, such as CIM extensions, not undeclared in the profile.
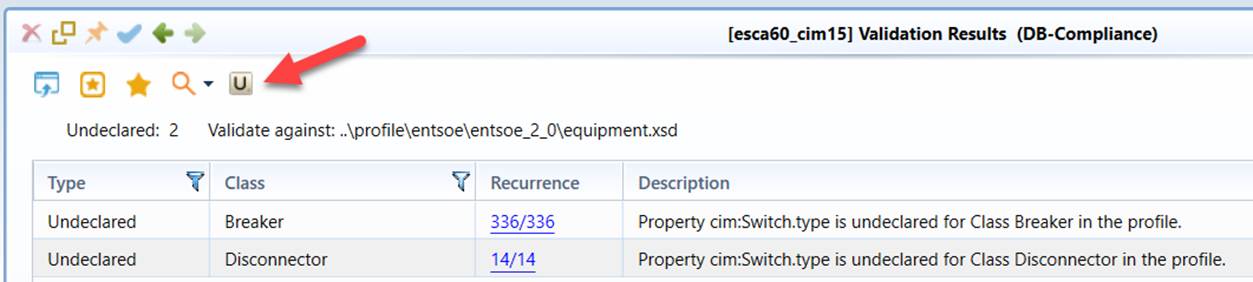
Once issues are detected, they shall be addressed before Model Depository initialization. Let’s understand how this works first
Auto-generated Table Schema
In RDBMS, database scheme must be first created before any database activities. Model Depository schema is auto generated from the model governing profile when the Model Depository is initialized with seed model. The database schema auto-generation supports any version of CIM, standard or extended. A CIM class defined in the profile corresponds to two database tables. The properties of the class define the table columns.
- Full Model Tables: used to store the base full model. Once model depository is initialized, full model tables are fully loaded and remain unchanged during model evolution (unless rebased). Full model table names are prefixed by ‘FM_’ by default.
- Incremental Model: used to store the incremental model changes during model evolution. Incremental model changes, grouped as Projects, are used to assemble a model release. Incremental model table names are prefixed by ‘IM_’ by default.
Note:
- Table names and column names follow naming conventions, with a prefix to CIM class name as table name, and attribute name as column name.
- Only full model tables are generated for model administration meta-model. These tables are prefixed by ‘MM_’ by default.
As an example, two tables are auto-defined for a standard CIM class of “ACLineSegment” in profile, i.e. FM_ACLineSegment for full (base) model and IM_ACLineSegment for incremental model (Projects).
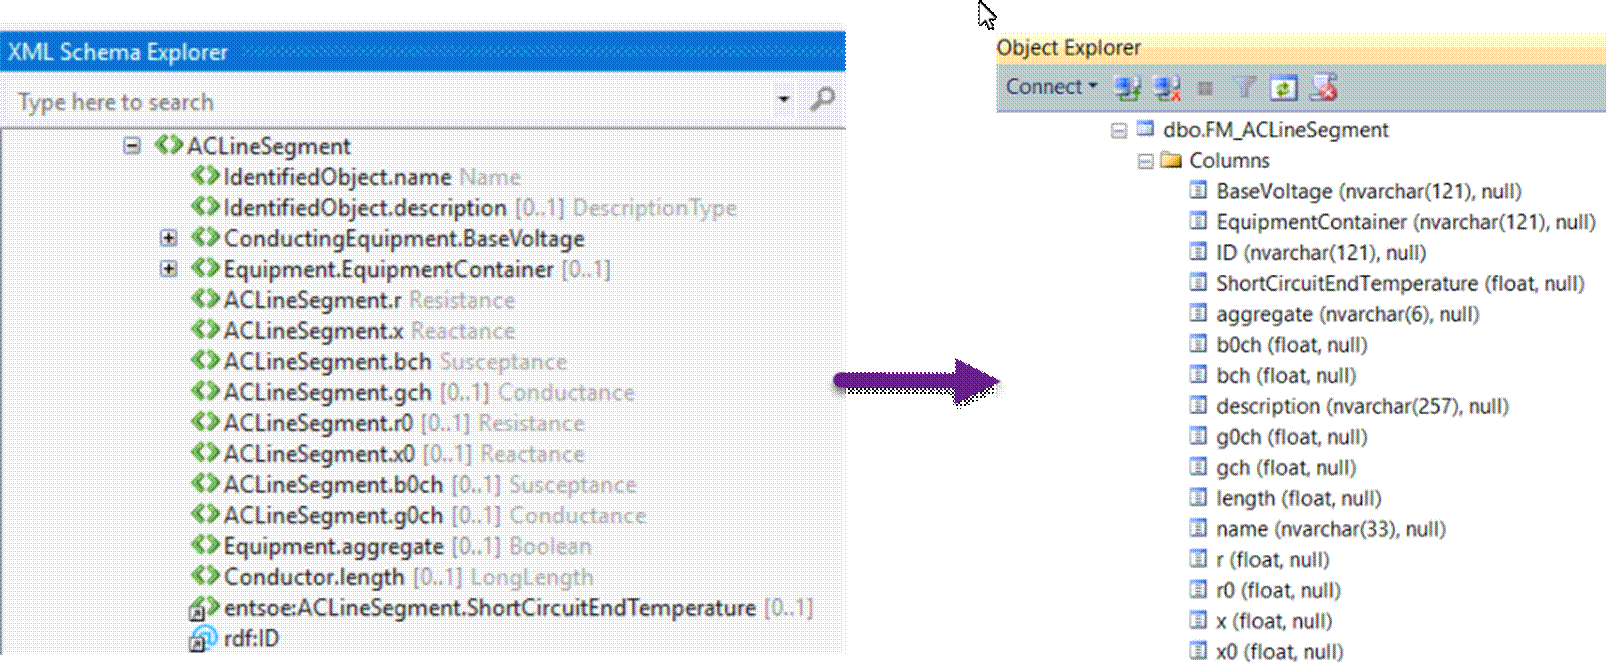
The imported CIM could be in any supported versions. The Tool will detect the governing profile and auto-generate the database schema during the Model Depository initialization. However if the imported model contains the CIM extensions, you must extend the governing profile by adding the corresponding extended classes or properties. Otherwise such information will be lost during the Model Depository initialization. The bottom line is any extended modeling entities must be explicitly specified in order to be editable and storable.
While the max allowable sizes of string-type columns are primarily determined by the profile specifications, users can customize these sizes by specifying the corresponding configurable parameters.
Adding Alias to Resolve the Database Naming Restrictions
The Tool supports various relational databases, including Oracle, MSSQL, and MYSQL. Each database has its own naming restrictions as listed in the table below.
| MSSQL | MYSQL | Oracle | |
| Maximum length of name | 128 character | 60 character | 30 character |
| Common Keywords to avoid | Index, open | Index, maxvalue, minvalue | Mode, index, date |
The auto-generated schema has to follow the naming restrictions, i.e. the table name and column name cannot exceed maximum length and names cannot be any of the database keywords.
Sometimes, CIM class and property do have long names. The table name or column name directly generated from the long name with added prefix and name space (in case of extended CIM) could easily exceed the maximum length limit. This happens mostly in Oracle, since Oracle has the smallest size limit. In that case, a popup message will be issued to report the problem. Similar popup will be displayed if keyword violation is detected.
Aliases were added to the profiles in the Tool as needed. Normally, users don’t need do this step. But if extended modeling entities are added and the names of the extended modeling entities violate the naming restrictions of the database, users need add the aliases to resolve the issues, as instructed below.
To resolve the naming restrictions, an alias must be added to the CIM class and property in the model governing profile.
- Add an alias at table level
- In model governing profile, locate the CIM class that violates name restriction.
- Add an annotation tag if it does not previously exist.
- Add an appinfo tag inside annotation. It should contain the following information:
- Source = “TableName”: this is a table name alias.
- dsmr:appliedTo=”ORACLE”: the alias is only applicable to Oracle database. Use “MYSQL” or “MSSQL” otherwise. If the alias should be applied to all RDBMS, there is no need to add this term.
- actual alias

With the added alias, the Tool translates CIM class “LoadResponsCharacteristic” to table names “FM_LoadResponseCharact” and “IM_LoadResponseCharact”.
- Add an alias at column level
- In model governing profile, locate the CIM class and property that violate name restriction.
- Add an annotation tag if it does not previously exist.
- Add an appinfo tag inside annotation. It should contain the following information:
- Source = “ColumnName”: this is a column name alias.
- dsmr:appliedTo=”ORACLE”: the alias is only applicable to Oracle database. Use “MYSQL” or “MSSQL” otherwise. If the alias should be applied to all RDBMS, there is no need to add this term.
- actual alias

With the added alias, the Tool translates the property “maximumAllowableSpinningReserve” of “GeneratingUnit” class to a column name “maxSpinningReserve” in “FM_GeneratingUnit” and “IM_GeneratingUnit” tables.
Initializing a Model Depository
Model Depository is typically initialized from a loaded and validated CIM/XML file. The behind-the-scene work involves database table clean up, auto-generate database schema, create database tables, and insert records into tables.
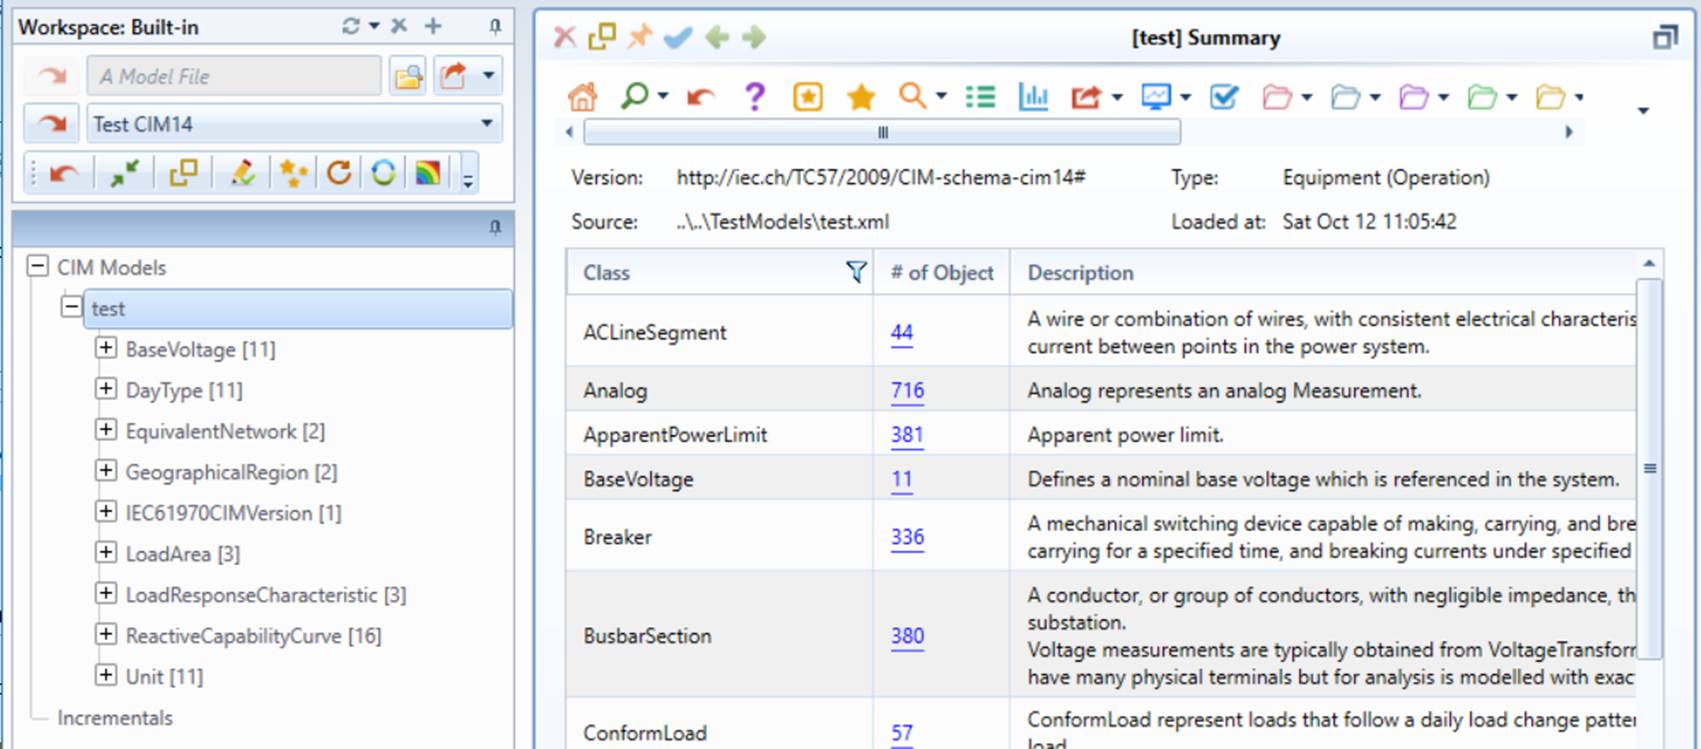
- Load the full CIM model to be used for initialization of Model Depository.
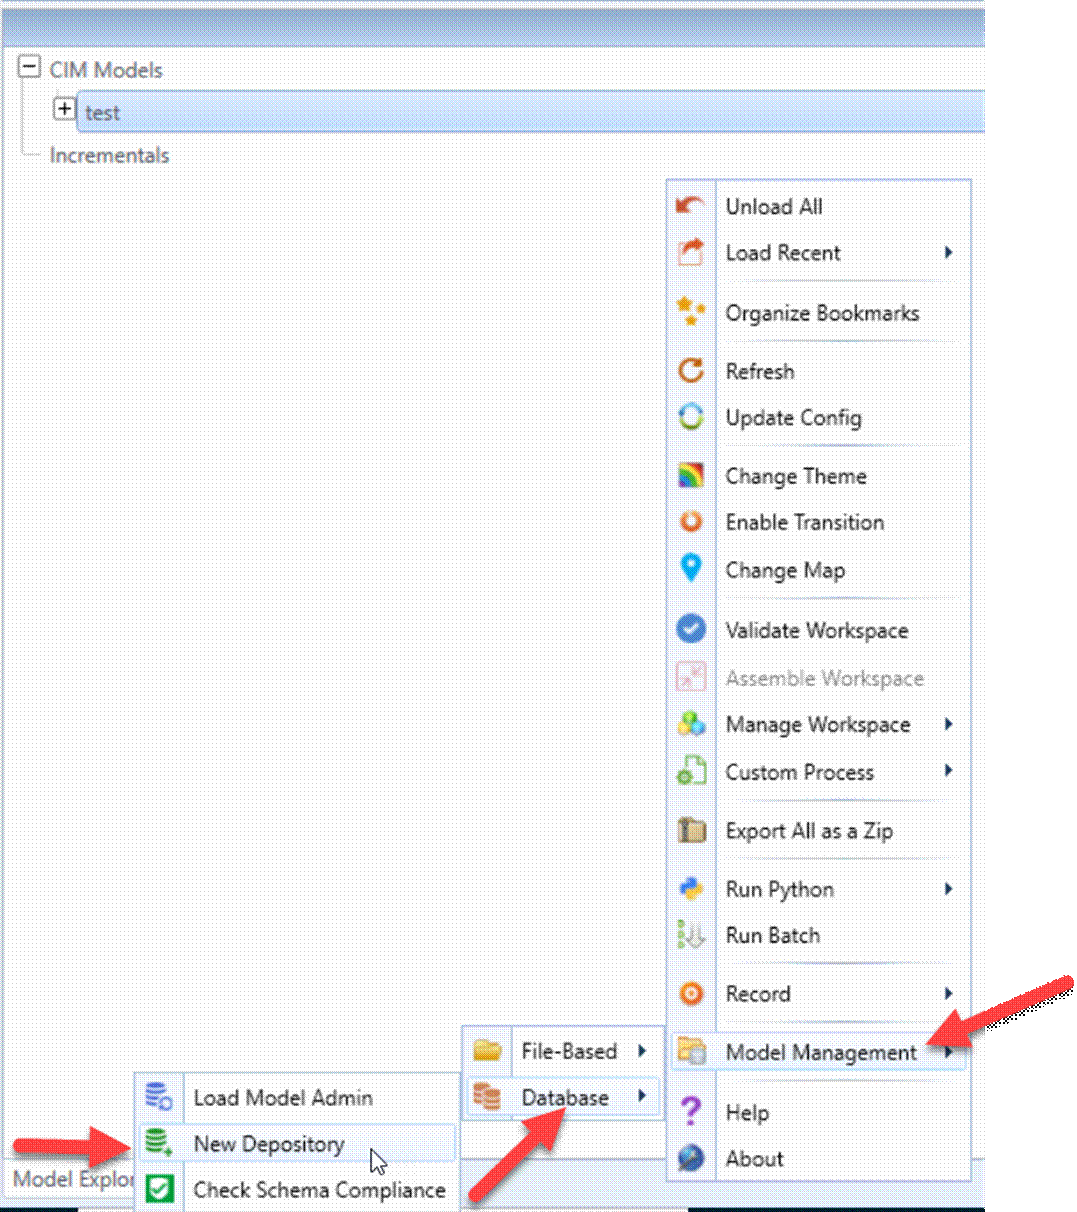
- Right-mouse click a blank spot in the tree panel to invoke the global context menu. Select Model Management->Database->New Depository from the global context menu.
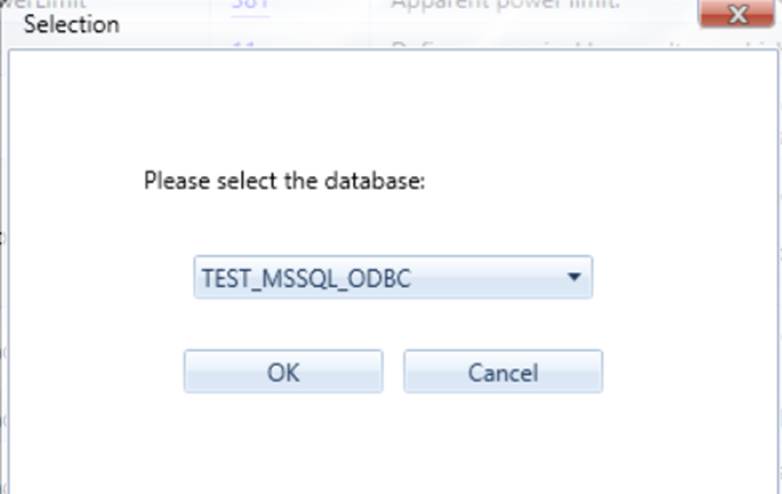
- Depending on data connection set up in configuration file, if more than one database connections are defined, user can choose from a drop down menu to select the database that will be initialized.
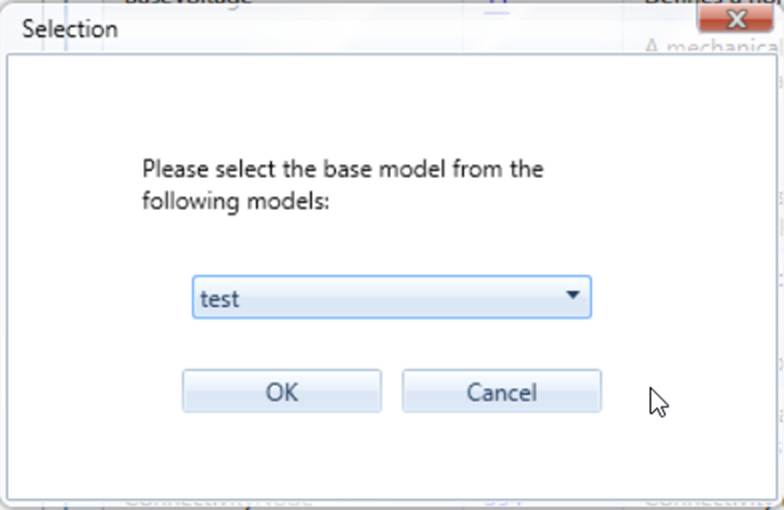
- Select the base model from a drop down menu to select the database that will be initialized.
- Depending on the initialization result, one of the following scenarios will occur:
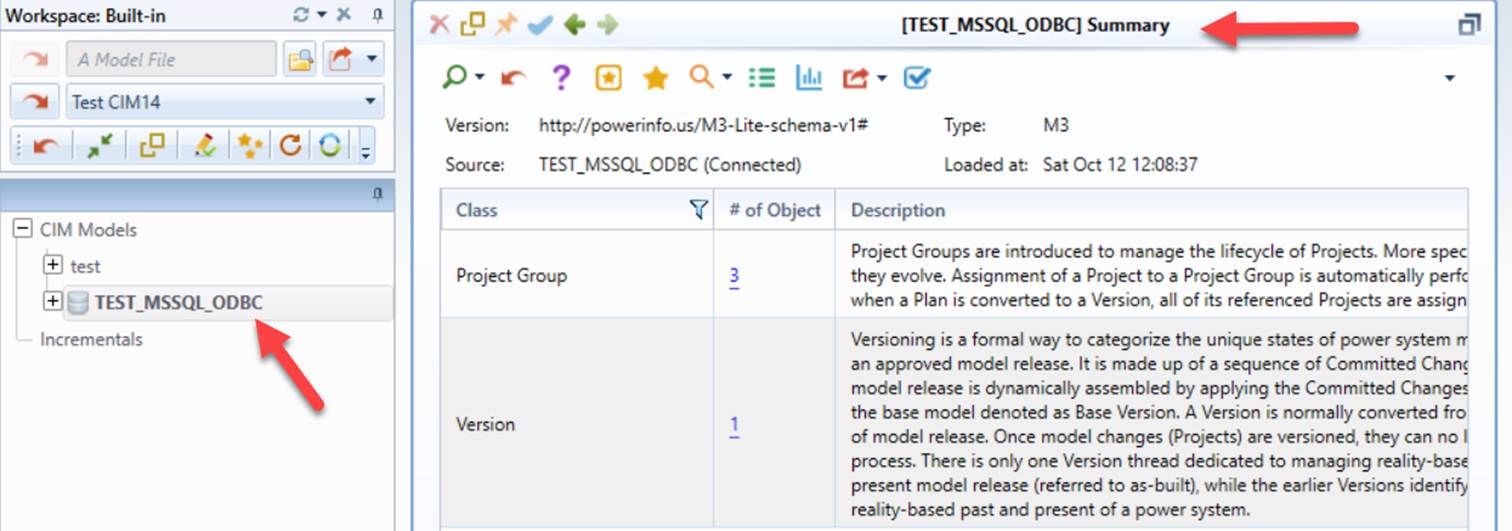
- If initialization is successful, the Model Administration Met-Model will be loaded. No message box will be displayed.
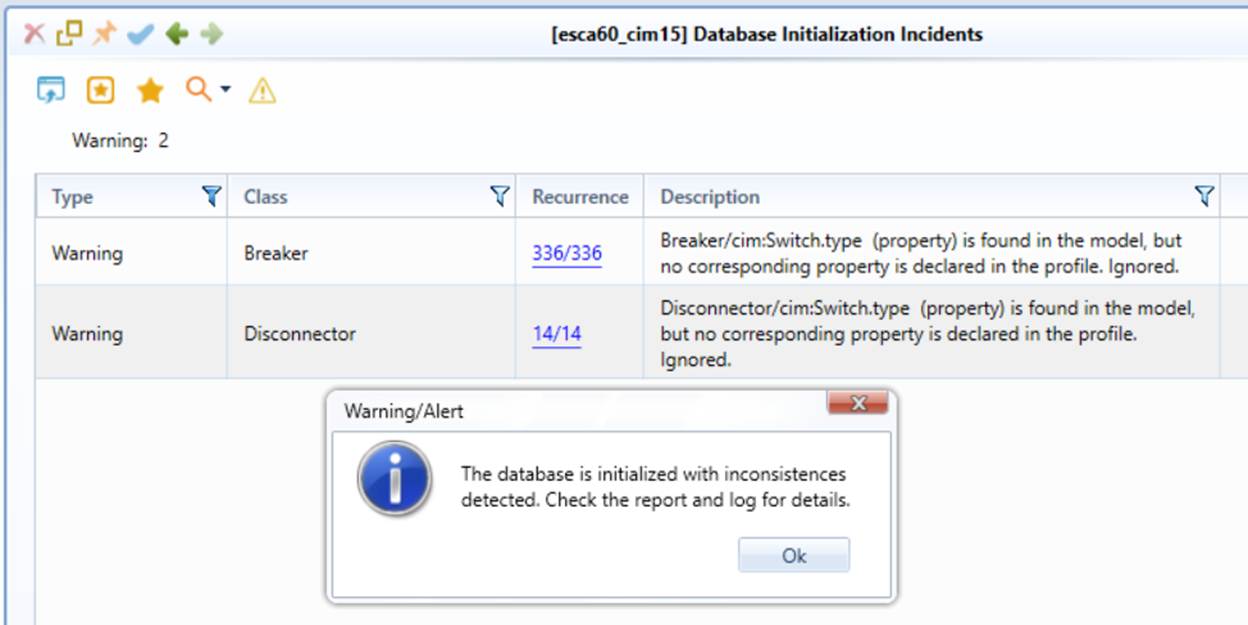
- If errors/inconsistencies are detected in database initialization, the Model Administration Met-Model will be loaded. The Tool will display an event log similar to a model validation report. It is strongly recommended you review each reported error or inconsistency (warning) and correct the model as needed.
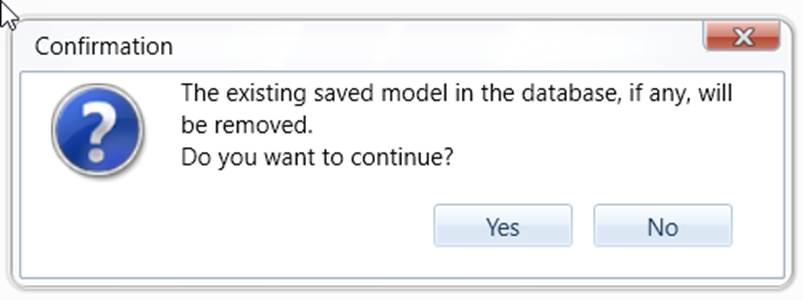
The database can be reused. If the target database is not empty, its contents will be cleared when initializing the Model Depository with a seed model. User will get a message before
Validating the Initialized Model Depository
After the database is initialized, users can load the Base version of model into workspace, as illustrated below.
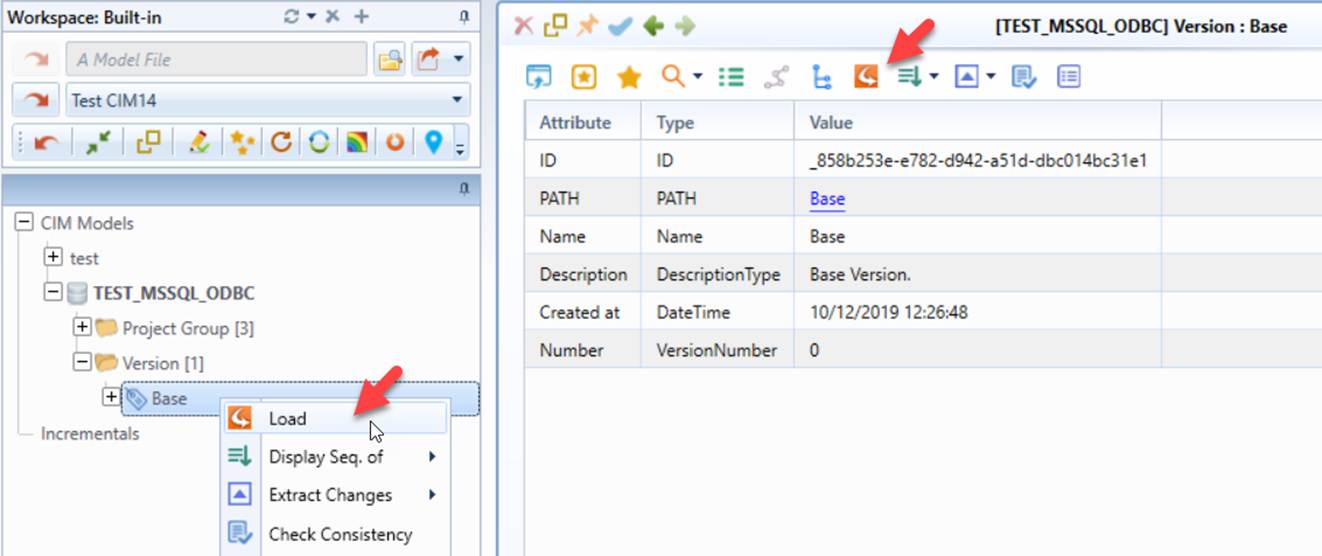
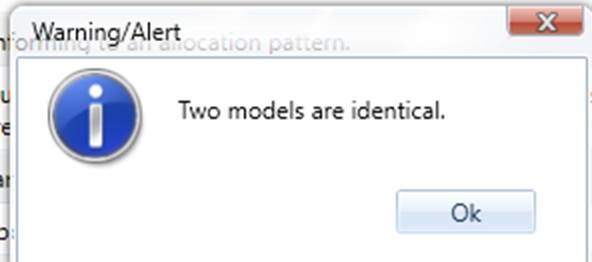
The base Version of the model saved in Model Depository after initialization should be identical to the “seed” model. This can be verified by running a model comparison between them.
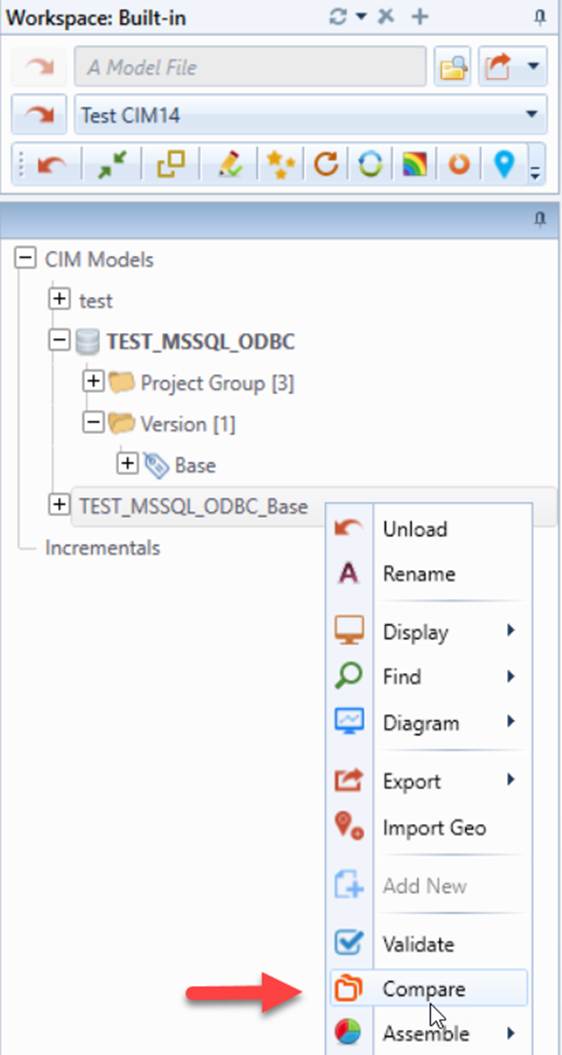
If the model is successfully saved into the database, comparison between the model loaded from the Model Depository and the seed model shouldn’t report any difference.
To avoid confusion, it is recommended to unload the “seed” model from the tree view after Model Depository initialization.
Loading Model Administration Meta-Model
Model Administration Meta-Model is used for model administration. It is normally the first step to load the Model Administration Meta-Model into the workspace prior to any model administration work. To load the Model Administration Meta-Model,
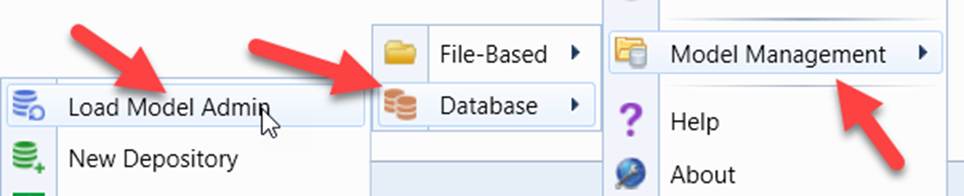
- Right-mouse-click a blank spot in the tree panel to invoke the global context menu. Select Model Management->Database->Load Model Admin from the global context menu.
\ \
- Select the Model Depository from dropdown listing all of the existing Model Depositories.
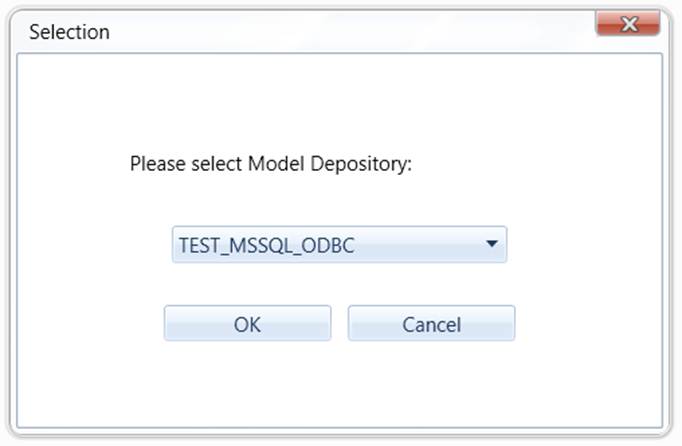
- The selected Model Administration Meta-Model will be loaded into the workspace.
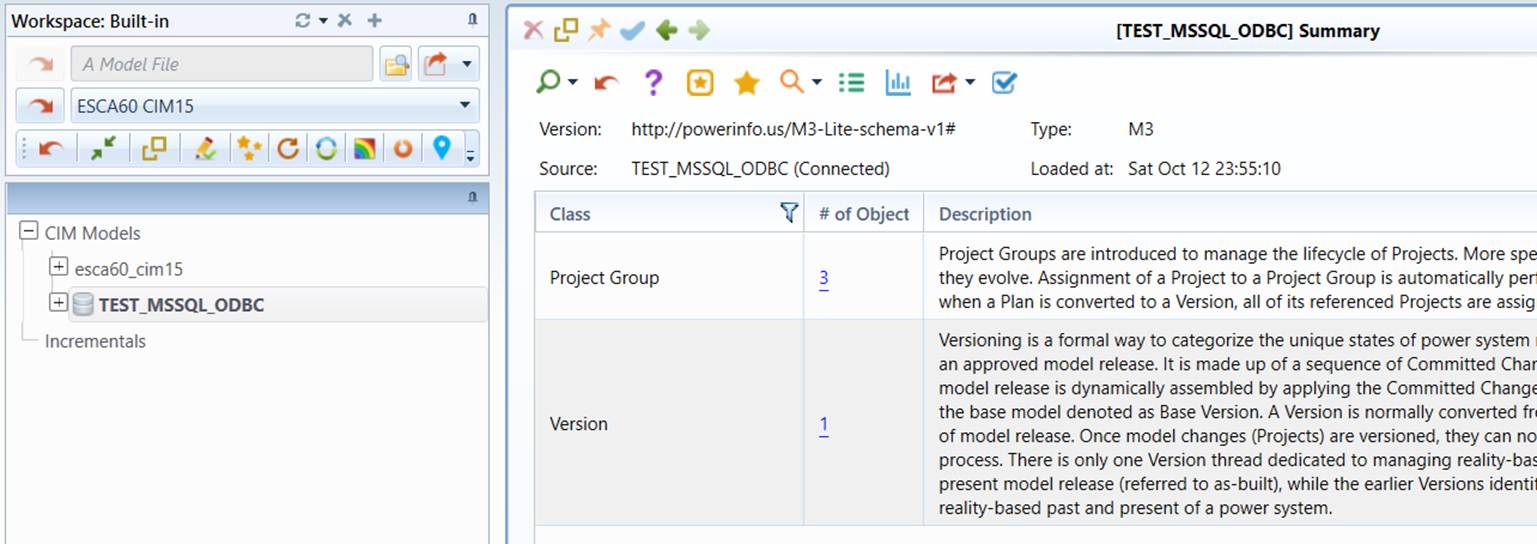
To facilitate loading of Model Administration Meta-Model, a Data Source can be defined in \config\CustomConfig.xml, as illustrated below.
The following attributes need to be specified as illustrated by the following example.

- name – data source name, displayed in UI
- type – M3_DB indicates the data source is a database Model Depository.
- Location – Model Depository name, must be a valid Model Depository DBConnection.
Once the data source is defined, users can load Model Administration Meta-Model from the data source dropdown list.